To keep my pollinator garden budget-friendly, I grow a lot of native plants from seed. It is easiest to plant them right in the ground in the fall because most need to go through winter weather before they will germinate. A number of native plant seeds will also grow when planted in the spring though.
Keep in mind that native plants grown from seed may not bloom in their first year. They ‘sleep’ the first year while they develop roots, ‘creep’ in the second year, and ‘leap’ in the third year with more vigorous growth once they’re established. While my new seedlings are settling in, I sometimes buy a few mature plants of the same type to help fill the garden. I also like to plant some pollinator-friendly annuals as fillers.
Finding native seeds
Finding Ontario native seeds isn’t easy. Finding local Ottawa native seeds is even harder. I have bought native seeds from the following:
- Ottawa Wildflower Seed Library – gardeners collect native plant seeds from their gardens, and donate them to the OWSL. The OWSL then distributes them for free to other gardeners at local events around Ottawa, and by mail.
- Wildflower Farm, Coldwater, Ontario
- Botanically Inclined, Southwestern Ontario
- Native Plants in Claremont, Pickering, Ontario
- Northern Wildflowers, Sudbury, Ontario
- North American Native Plant Society Seed Exchange, Toronto-based organization
Cold, moist stratification
Many native plant seeds need to go through winter weather before they will germinate, unlike the tender annual and vegetable seeds we usually plant in spring. This process is called ‘cold, moist stratification’ (CMS), or is sometimes referred to as ‘pre-treatment’.
While you can simulate CMS by placing native plant seeds in a slightly moistened medium in the fridge, I prefer to plant seeds outside and let nature do the work for me.
In fall
It is easiest to plant native seeds right in the garden in the fall. You’re mimicking the way many seeds are planted naturally. When the weather warms in spring, the seeds will sprout and grow in their new home.
Seed planting depth
If you bought seeds, follow the seed package directions or online instructions to find out how deep to plant them. A general rule, planting depth is twice the diameter of the seed. For a large seed like milkweed, plant the seeds 1/4 of an inch deep, but for tiny seeds like mints, surface sow them. Surface sowing means that you sprinkle them on the soil, press them gently into the soil with your fingers or dust a tiny bit of soil on top of them (so they don’t blow away). These seeds need light to germinate.
In winter
Believe it or not, winter is the second best time to start seeds outdoors. That’s right, you can plant your garden outside in January! By fall, I’m usually tired of gardening, so I rarely get my seeds planted directly in the garden in fall like I know I should. After the holidays pass, however, I am eager for spring and ready to start.
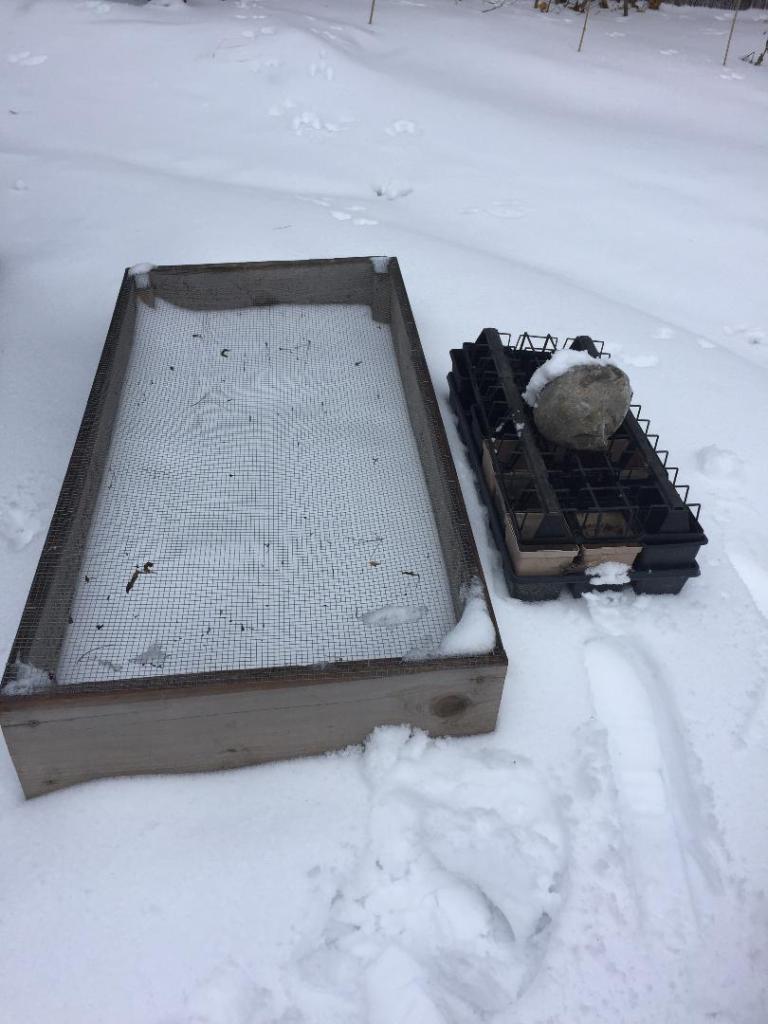
Miriam Goldberger of Wildflower Farm (a native seed vendor from Southwestern Ontario) encourages you to put seeds in pots right outside in the snow. This way, you can still let nature take care of the CMS, even if you can’t find your garden bed because of the snow. This method is listed as the ‘Outdoors Alternative’ on each seed product page. Alternative it is! Since I began planning my pollinator garden in January of 2017, I gave this crazy-sounding method a whirl. I was skeptical, but it worked like a charm.
I cover the pots to keep squirrels out. I use a home-made cedar frame covered with hardware cloth, or upside-down pot carrying trays.
You can fill pots with soil quickly by following the Indigenous Landscapes method demonstrated in their Pot loading video for the E-book Native Plant Nursery Model and Propagation Guide. Although this needs to be done outside, it is so much better than filling pots one at a time like I have been.
Soil and pots for starting seeds
That first year, the only seeds that failed were for plants requiring well-draining soil; they rotted in my regular potting soil during the particularly rainy spring. I had much better success the second time around in 2018.
Use soil-less seed starting mix in your pots. At a seed collection workshop with Trish Murphy, of Beaux Arbres Native Plants, she recommended that you can still use potting soil if you mix in a third to a half of perlite to ensure that it is well-draining. For plants that need super-sharp drainage, you can mix in bird grit, which is available from pet stores.
Typically, you grow seedlings in seed-starting trays with a tiny compartment for each one. I don’t want to buy more pots, so I just re-use 4-inch pots that I get when I buy plants. Also, I don’t want to have to transplant seedlings from seed-starting trays to larger pots. I’d rather just start the seedlings in the pots they’ll live in until they go in the garden. I find that home-made newspaper pots and peat fibre pots dry out too quickly, and thus require too much baby-sitting and watering.
Artificial cold, moist stratification
If you’re up for the challenge, you can try artificial cold, moist stratification CMS in the fridge. Prairie Moon Nursery, in the States, has excellent germination instructions and details for different types of germination requirements on their web site. On each plant product page, hover over the germination code to see brief instructions. For more in-depth information, check the hefty tome The New England Wild Flower Society Guide to Growing and Propagating Wildflowers of the United States and Canada, which is available at the Ottawa Public Library.
I have only tried this method a few times with mixed success. The first time, I placed butterfly milkweed seeds in a baggie with a moistened paper towel. It must have been too moist because the seeds went mouldy. The second time, I tried a variety of seeds planted in moistened soil in seed-starting trays and placed them in the fridge, and it was much more successful. This took up valuable fridge space though. With some experience, artificial cold, moist stratification will give you more control over the process than the unpredictable conditions outside.
Is it too late?
In March, Beaux Arbres Native Plant nursery sells seeds at Seedy Saturday (held at Ron Kolbus Centre). Every year, I buy some because they are usually from local plants. If they’re planted outside in pots right away, there’s still enough time for most seeds to cold, moist stratify. However, if they require CMS for a long period, such as 90 days, March may be too late. Again, Wildflower Farm comes to the rescue. You can try their ‘Speed Dial’ method demonstrated in a video by Miriam Goldberger (under “Starting Flower Seeds”). You move the seeds back and forth, from fridge to freezer, to mimic the freezing and thawing that happens throughout our long winters.
In spring
Some native plant seeds will germinate without pre-treatment (CMS), so they can be planted right outside in the garden in spring. Wildflower Farms includes such seeds in their “Sow and Grow” section. Here’s a complete list they sent to me by email:
- common yarrow
- anise hyssop
- pearly everlasting
- silver sage
- harebell
- lance-leaf coreopsis
- purple prairie clover
- blanket flower
- blue flax
- lupine
- bergamot
- dotted mint
- evening primrose
- white aster
- mountain mint
- Culver’s root
- as well as all of the native grasses
You can also find a list of seeds that don’t require pre-treatment on Prairie Moon Nursery’s web site, searching by Germination Code A. Some others, not included in the Wildflower Farms list, are:
- smooth aster, as well as a variety of other aster that grow in sun
- showy tick trefoil
- purple coneflower
- sneezeweed
- shrubby St. John’s wort
- wild bergamot
- spotted bee balm
Some seeds’ germination requirements seem up for debate. I am going to experiment this year by planting some seeds outside for natural CMS, and others outside in spring without pre-treatment. I’ll let you know how it goes.
Tips for working with seeds
- Be careful when opening seed packets because many seeds are small ( tiny balls, or fine like dust). I open them onto a white dinner plate or bowl to avoid losing seeds. If I want the seeds in the palm of my hand, I gently shake the packet with my hand over the plate.
- If seeds are on the place and too small to pick up, push the pad of your finger into the seeds (on the plate), and some will stick to your finger.
- When you plant your seeds, outdoors in the garden or in pots, be sure to label them. Otherwise, you will end up with mystery plants. I use plastic sticks and write the name twice on one side; when I push the stick into the pot, one end is in the soil and one end is sticking out. If the sun fades the exposed end, the buried end will still show the name.
- Draw a quick map or diagram of your pot arrangement, so you have a back-up record of what you planted where. If your tags fall out, you can consult your map to identify your seedlings.
- If you do end up with mystery plants, consult Miriam Goldberger’s book Taming Wildflowers book. She includes photos of native plant seedlings so you can easily identify them from their leaves. These photos are also helpful while you’re weeding.
